An indispensable household appliance, without which it is impossible to even imagine a normal life, has a very bad habit: it always breaks at the most crucial, inappropriate moment. Often an unpleasant surprise is presented by the first assistants of the owners — irons, suddenly refusing to work. To understand which element is to blame for this “strike”, one must first get to the inside of the device, but it is this simple stage that often becomes a stumbling block, since disassembling the iron without breaking it at the same time is not for the faint of heart. The insidiousness of these simple devices lies in fasteners that are securely hidden from view. Therefore, the master, who took up such a difficult task, often has to demonstrate the wonders of ingenuity.
The device of modern irons
There are many manufacturers of irons, however, structurally, all models differ little. The shape, quality and quantity of spare parts, the heating rate of devices can be different, but they all have the same components. It:
- A container for steaming water.
- A housing made of heat-resistant plastic with a heat-insulating gasket.
- Sole in which the TEN is built in. This work surface has openings for steam to escape.
- Automatic steam dispenser.
- Water / steam nozzle.
- Thermostat that allows you to select the desired temperature for heating the sole of the device.
- Power cord for connecting to the network.
If there is nothing complicated in the device of this type of household appliances, then in the task called “how to disassemble the iron” there are a great many riddles and obstacles in the way of the master. We have to thank for this the manufacturers, who are extremely negative about the initiative of the owners.
Types of electrical appliances
This is the most common household appliances, therefore, its owners encounter breakdowns quite often. Irons come in three types.
- Ordinary, devoid of steaming function. Now they are not so popular, but their small cost and compactness allows the use of such devices as a “camping” option, saving clothes on trips.
- Partitions with a steamer — a water tank. There are small openings on the soles of these handy devices that allow steam to escape. These irons are, on the contrary, very much in demand.
- Irons with a steam generator — steam stations. These devices have a separate water tank, a heating element is built into it, and steam is supplied to the sole of the iron through a special steam line.
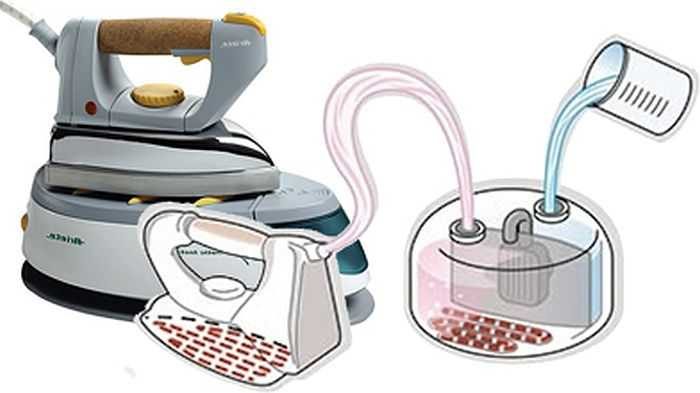
Devices with steamers are the golden mean, this explains their popularity. Repair of such devices is not too complicated, the main thing is to «get to the truth» — to find those responsible for the breakdown.
Types of problems and their causes
Before disassembling the iron, it does not hurt to get acquainted with the list of more common malfunctions, and with their possible provocateurs.
- The device does not want to turn on. In this case, the fault most often lies on the power cord damaged in one or several places.
- The iron shuts itself off. This is proof of the correct operation of the thermostat of devices with an automatic shutdown function. The goal is protection against overheating.
- The temperature controller is not working. There may be several reasons. Among them, carbon deposits formed on the contacts, damage to the bimetallic plate, damage to the rod-rod.
- The appliance does not heat up. Blame TEN. Replacing this element is impractical in any case, since it is quite expensive.
- Water flows out of the iron. The valve for supplying fluid to the sole is to blame, or rather, its damaged gum. Independent replacement will fail.
- Poor steaming system. This trouble is a consequence of the use of low-quality water. Optimum distilled, refined or boiled.
- Steam button does not work. The tube located inside has broken (cracked).
Having learned in advance which unit can be blamed for the problem, there is a chance to carry out repairs quickly and efficiently, but this operation is far from always successful.
What do you need to work?
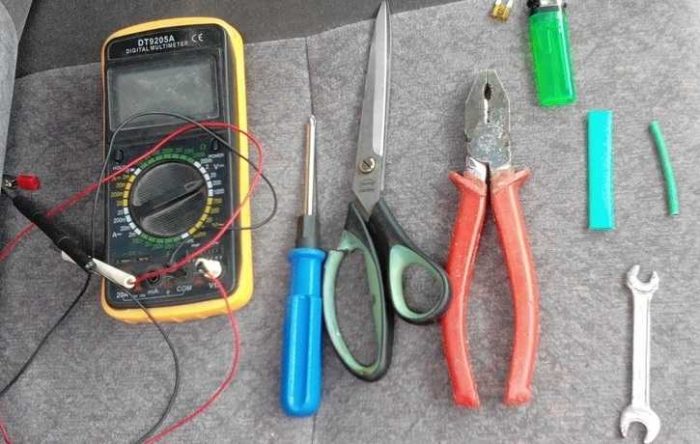
In order not to be distracted by the search for everything you need for work, you need to collect a whole set of different tools and materials near the iron in advance. For disassembly and repair, with a high degree of probability, you will need:
- electrical tape or heat shrink tubing;
- pencil (stylus);
- multimeter (tester);
- sandpaper (fine grain);
- scissors;
- screwdrivers — regular and Phillips;
- soldering iron;
- plastic (old) card or a wide knife (for opening latches);
- pliers (platypuses, ducks).
After collecting all the materials, you can begin to slowly and accurately disassemble the unit.
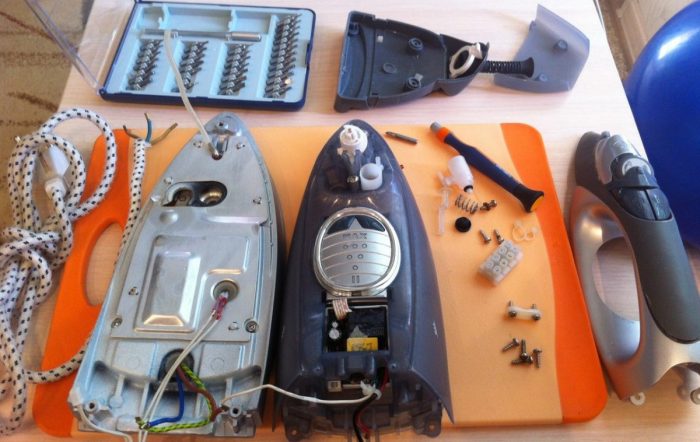
How to disassemble the iron?
The small dimensions of the household appliance in this case are a big drawback, not a dignity: all the fasteners are “hidden” in those places where it is most difficult to get. Another difficulty is the fastener latches made of plastic, they are quite easy to damage, so maximum care and accuracy are required.
Instruments Bosch, Brown, Philips

The dismantling order of these irons is the same, since the designs are very similar. Dismantling of mini-units is carried out according to a typical scheme.
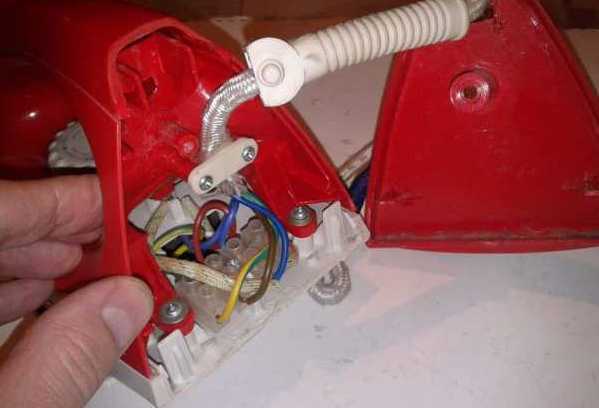
- Take a screwdriver and unscrew the two bolts \»settled\» on the back cover of the device. If the terminal box does not look the best (the cord is melted, the contact is blown), then the iron will not be further disassembled.
- Remove (pry) the central cover, which goes to the regulator from the back wall. Armed with a flat screwdriver for this operation.
- Remove the temperature control knob. At this stage, they act cautiously, because you can not lose the spring of the switch dial.
- Take out the control unit and the heating element connector, then the indicator with the power cord. Here, to alternately bend the latches, a long screwdriver is used.
- Pull out — pull back — the entire electrical part, then remove the spray cap. The screw located behind it is unscrewed with a Phillips screwdriver.
- Remove the sole: disconnect the 2 latches located on the back of the iron.
After identifying and fixing the breakdown, assembly work is carried out in the reverse order. Haste during work will inevitably lead to damage to the elements of the device, so they act slowly and patiently.
Irons Scarlet, Roventa

In this case, the algorithm of actions is slightly different, therefore, they act differently.
- First remove the protective cap located on the back of the iron, which conceals the fastening screw. Do the work with a knife or scissors.
- To unscrew the screw inside, use small platypus pliers or scissors, since the head of the fastener is non-standard — not one of the screwdrivers will fit it.
- In order to maximally facilitate possible future work, in place of an uncomfortable screw, they select the fastener whose head is suitable for screwdrivers.
- Remove the lid, which closes the opening of the water tank. They take a Phillips screwdriver, unscrew the screw hidden there.
- Remove the upper part of the handle, then unscrew the remaining fasteners. Remove the temperature control knob with a knife.
- Remove the upper part of the iron body, then use a Phillips screwdriver to unscrew the screws holding the sole of the appliance.
Having finished with the last stage, they begin to search for damage. The most important thing when disassembling the device is accuracy and smoothness of action. In no case can you pull the levers, knobs and buttons with all their might. If something rests somewhere, then first you need to explore all the possible obstacles, and then squeeze or unscrew them. Particularly reverent relationships require insidious latches, as these flimsy structures break “with pleasure” — elementary and quickly.
Checking Elements
There are malfunctions simple and complex, the first can be dealt with on your own, the second is not so easy to eliminate.
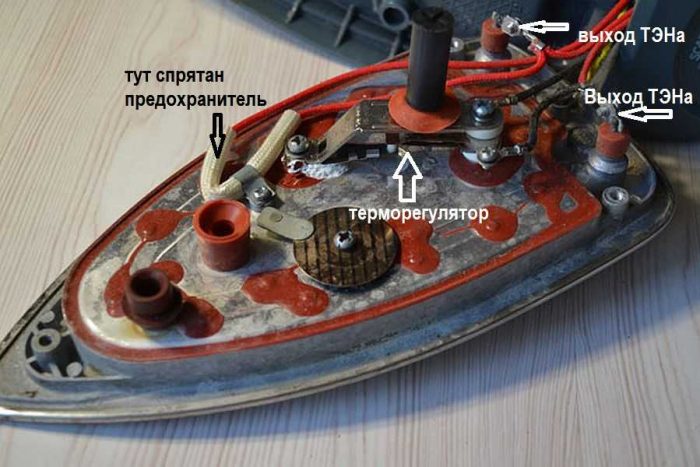
Fuse
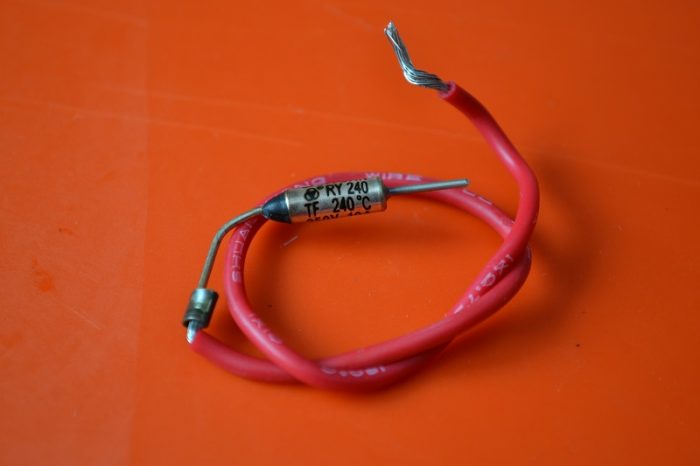
It is located next to the thermostat. The thermal fuse protects the sole from serious overheating. A protective tube is put on a small device. It often has a white color. Checking the fuse — ringing its contacts. You can test directly by sliding the protection tube, or by finding the contacts in the circuit.
If the case is a thermal fuse, then it is evaporated, sent to the store, taking it with you, and buy a similar device. Then set it in its original place. An exception to the fuse circuit is a big mistake, as it is able to protect the house from fire.
Power cord
His gap is another common misfortune. Symptoms of damage — failure of the iron to turn on, intermittent operation of the device, insufficient heating of the sole. If suspicious areas are found, the cord should be replaced. Isolation of problem areas is the second option for repair, but it is not optimal.
To check the hunch, the cord is also called. In this case, complete disassembly is not required, since it will be enough to remove the back cover to gain access to the terminal block. One probe of the multimeter is pressed to the contact of the plug, the other to the wire on the block. To make sure that all sections of the wire are working, they knead it during the test or try to bend it, twist it.
Spray system
In this case, the master will not have to look for the answer to the question of how to disassemble the iron, since the problem is solved quite simply in most cases. If in the presence of water in the reservoir steam in normal quantities refuses to form, then, most likely, the holes in the sole are clogged with salts.
They clean the iron from scale in the following way: pour a solution of vinegar (per liter of water — a glass) or citric acid (per glass — a tablespoon) into a wide heat-resistant dish, put the iron with a steam regulator set to maximum. The platform must be covered with liquid by 1 cm. To keep the nose lower, coins are placed under the back of the sole.
The container is sent to the hotplate, the liquid is brought to a boil, then turned off for half an hour, and then turned on again. The operation is repeated 3-4 times. The result of this procedure — cleaning the holes — will be visible immediately, but for some time there may be traces on the laundry, the outgoing sediment is to blame for them.
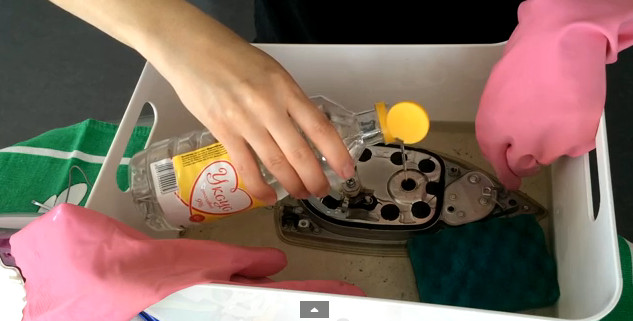
The second way is safer. In this case, the iron is disassembled to the base — the soles. It is also put on gas in a container. Or glue it from below, and then fill in one of the proposed solutions. It is changed after complete cooling. When they get rid of scale, the sole is washed with clean water.
Another two potential problems are the disconnection of the tube through which water is supplied and the deformation of the tank. In the first case, the steam does not leave the sole at all. To remedy the situation, they disassemble the panel on which the injection button is installed, and all the tubes and wires are returned to their rightful place. With deformation (inflating) or rupture of the water tank, there is only one way out — buying a new iron.
Thermostat
To check it, it is necessary to disconnect the plastic casing from the sole. The temperature controller consists of three parts: two plates — bimetallic and contact — and a rod attached to them. The first plate is in contact with the sole. When heated, it bends, at maximum temperature it opens the contacts. When cooling, the plate returns to its previous position, causing the sole to heat up again.
The first stage of verification is scrolling to different positions. If there is a click, then the regulator is in order. Now they check the availability of power supply — by the test of the contacts with which the heater is connected to the regulator. If the multimeter makes a squeak in the dialing mode, and is silent in the other (extreme) position, then that means that everything is normal.
Sometimes the contacts burn out, oxidize or weaken. Clean them with sandpaper or a nail file. Do the operation carefully, trying not to bend the plates, not to remove a large layer. If the regulator has lost its smooth running and it is possible to crank it with effort, then it is rotated several times in different directions using pliers. The designed unit is rubbed with a graphite pencil stick. After all repairs, but before assembling the iron, contact is checked again.
TEN
This is the most unpleasant breakdown, since manufacturers often solder the heater in one housing with a sole and a water tank. Therefore, a malfunction in one of these nodes ends with the purchase of a new device. There is a small percentage of exceptions: the sole can be saved if strong contact oxidation has occurred. In this case, they are sought, cleaned, crimped.
Check the heater by measuring the resistance. For irons, electric heaters are used that have a resistance of about several tens of ohms, it depends on the power. A more accurate figure is found in the passport of the device. If the resistance is in the range of 25-50 Ohms, the device is serviceable. When the multimeter shows \»infinity\», things are bad — the heating element has burned out, but there is little sense in replacing it.
Safety Precautions
A steam iron is an electrical appliance that also comes in contact with water, so caution when disassembling such dangerous equipment is required. Before starting work, disconnect the iron from the power supply, and only then drain all the water. If serious problems are found precisely in the electrical part, then it is better to immediately contact a service center.
Since it is not very difficult to disassemble the iron, many consider it their duty to find and fix the problem on their own. However, this does not happen in all cases, so it is sometimes much easier to buy a new device than trying to reanimate the old one with your own hands. The same applies to his repair in the workshop. The costs fully justify the purchase of a new iron, to which the owners should already be treated with «reverence.» First of all, this concerns the recommendations of manufacturers, as well as the use of the cleanest water for the device.
Prevention of ironing problems
So that the owners do not have to learn how to disassemble the iron, how to repair it on their own, it is better to strictly follow some recommendations that can prevent possible breakdowns. The long service life of the unit can be expected if:
- always check the surface of the sole — remove adhering debris and small fibers;
- do not clean the iron with completely unsuitable compounds, such as salt;
- prevent overheating of the equipment, do not leave it alone;
- do not attempt to repair wireless devices yourself;
- abide by the recommendations that all things are provided with;
- do not iron products with a pile without gauze using steam;
- do not leave the iron wet or damp;
- absolutely not allow him to fall.
Cleanliness, constant supervision and careful handling will eliminate breakdowns and save money. And if nevertheless the trouble happened, it is better to first see how experienced disassemblers advise how to disassemble the iron. For example, this video will show the correct sequence of actions:
